
==========================================================================
Rory
McCreadie’s step by step guide to painting and rigging 1:1200 Scale Napoleonic
Ships
Part I Painting
Hi Guy's
I'm not a Modeler that wargames, but a Wargamer that models. Vol Willams is the brains behind all this, He found this helpful and wished to share, thinking it would help naval wargames of the SOL period. This is how I do it. It is not the best or only way, it's just my way. You can use this guide for most scales used for SOL gamimg. You can take it all or in part as you wish. I base the work from Rod “Langton's Paint and rigging guide” with Rory add-ons and misses. I hope this helps my Shipmates in what to do or not do with model ships. I am making wargaming models not art. So here goes. I would read through each part before starting.
I'm not a Modeler that wargames, but a Wargamer that models. Vol Willams is the brains behind all this, He found this helpful and wished to share, thinking it would help naval wargames of the SOL period. This is how I do it. It is not the best or only way, it's just my way. You can use this guide for most scales used for SOL gamimg. You can take it all or in part as you wish. I base the work from Rod “Langton's Paint and rigging guide” with Rory add-ons and misses. I hope this helps my Shipmates in what to do or not do with model ships. I am making wargaming models not art. So here goes. I would read through each part before starting.
I'm going to use Langton's NR5, M-TJ, MX16 and PE4 for painting and standing rigging.


I drilled a fine (small) hole just above the main mast fighting top. Through the lower bow. Behind the Catheads and Channels (4 holes each side). I also drilled bigger holes though the mast holes.

I added the Bowsprit to the ship. The Activator
helps here.


I paint the Stern and the Bows, Head Rails Black.


This one is very hard to
show, I added a brown to the Head rails by dry-brushing it over the black.

I will not tell you what colours to use.
That is up to you and what fleet you are painting. I dry brushed Bronze over
the whole Stern. Some of you may wish to add more detail at this point on the
Stern. I had to use two photos for this one.

I painted the inside top of
the Stern Bronze too.


Now it's time to clean out the drilled
holes with a pin. Do this often.

For the decks, pick two colours that match.
But one a little darker.

Using the darker of the two, paint the main
gun deck in the waist and the Beakhead.

Paint the rest of the decks with the
lighter colour. Sorry! Not a good photo!

Around this time I paint the model number
under the new ships base.

I now paint the Catheads and the front
bulkhead behind the Beakhead, both sides and along the top. This could be done
at the hull stage if using the same colour as the hull. As I was using the same
colour I also painted around the Gratings.

The next bit is the start of the “Oh! My
God.” Mistakes can and will be made. It is O.K. as you just paint over your
mistakes. It is now hard to take photos of the work as it is getting smaller
for now. It is mostly just dots and short lines.
I painted the inside of the Bulwarks and Waist.
I painted the inside of the Bulwarks and Waist.

The Gun Carriages and some of the deck
furnishings. Again not the best photo.

I finished off the deck furnishings and
Bitts on the inside of the Bulwarks with a darker colour.


The last part of the inside
of the ship is the black bits: The galley chimney, the Cannon barrels and the
doorways to the inside of the ship under the decks.


I have painted the white lines on the ship.
The lines are painted on the line of the gun ports.

As I was doing the white colour I
dry-brushed the base.

The last bit of this run is the rest of the
hull under the bottom Wale. This can be white for the lead paint. Before 1779
all ships had lead painted bottoms, after this date more and more ships had
copper bottoms. As the Russians sat for a long time in iced up harbours, I have
painted my Russian fleet with old copper e.g. dark green.

I painted the gun ports
black and did a little (lot of) re-painting.

The start of the sails and masts. Colour of sails??? I have tried many colours of sails from dark browns to white. I try to use 2 colours on the sails. You must use what you like the look of yourself. I paint the sails a base colour.

I dry brushed the sails with a darker
colour at the bottom sides. Large areas, not just the corners and across the
reefs.


Using the same colour, I
painted the lines across and down the sails. Sorry not a good photo.

I then painted the yard arms.
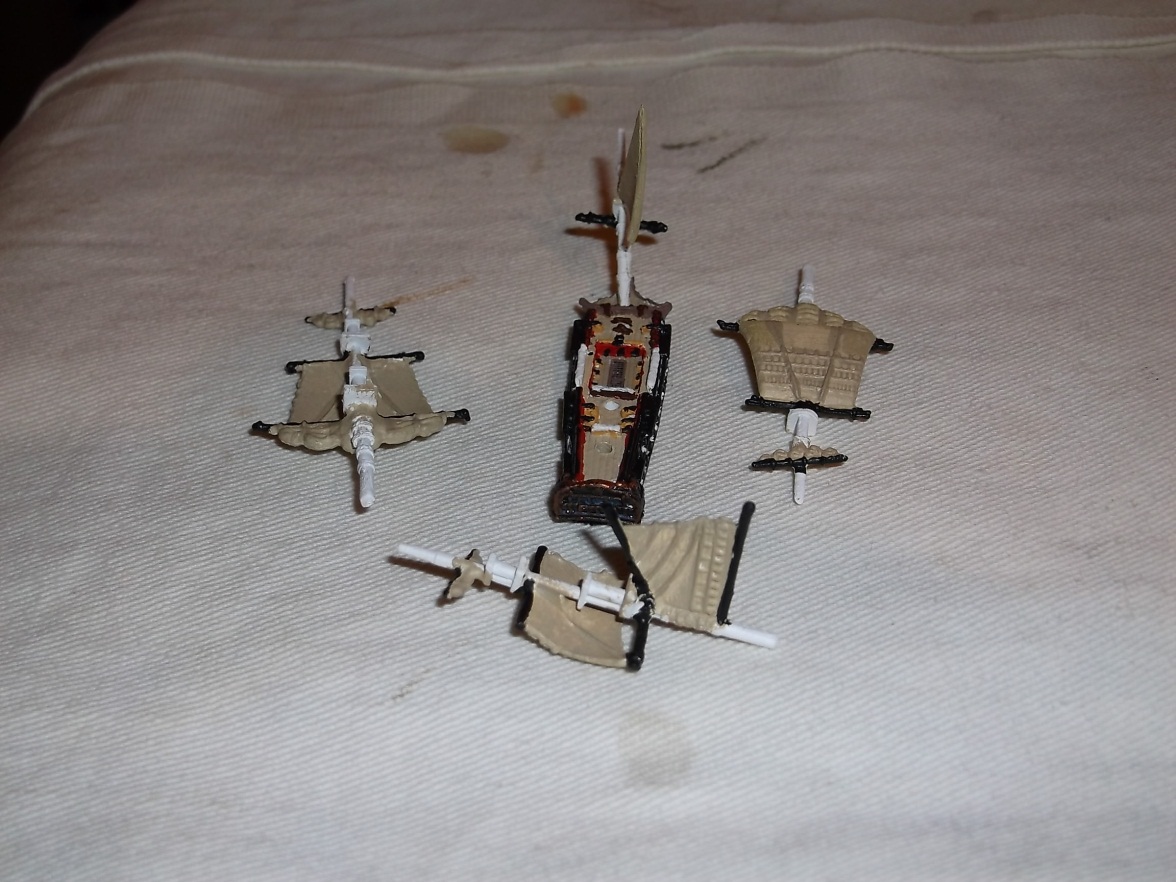
As I was painting the yard arms
black, I painted the first side of the ratlines.

The upper masts are done.

Afterwards I painted the lower masts. I
find doing it this way round is better for me, as you are working from the
inside of the mast to the outside.

I then paint the tops and fighting tops.
They are mainly black for all fleets. I paint the underside first.

I now paint the 2nd side of the ratlines.

The last part I do of the paint job is the
iron bands around the lower masts. For this fleet I use black. Nelson liked his
fleets to have yellow. Before 1800 the bands were made of rope, so would be
brown.

Just have
to put it all together and start the rigging. That is the next part.
I use thick super glue. Langton say's to
use thin glue; I find that I can control thicker glue better. You must watch
for buttons of glue on the tops on the masts.
Re-drill the mast holes as painting can
fill them in.

I rub off a little of the paint from the
bottom of the masts with fine sand paper. This stops a collar of paint being
push up around the mast.

I use a cocktail stick to put the glue on
the model.

By spinning the stick you can keep the glue
on the end of the stick as you move into/onto the model. When in place stop
spinning and let the glue drop.

Do the foremast first. Line up the 3rd top
with the jib or first jib if more than one. You may have to bend the jib or the
bowsprit a little to make it fit.

Make sure the main mast is a little higher
than the foremast and a little backwards.

Add the mizzen mast.

As I have the glue to hand I glue the name
to the base (badly this time).

I spray the ship and base with matt
varnish.


I use the pin again to clean the holes on
the ship before rigging.

======================================================
Well that completes Part I Of Rory's Guide. Stay tuned for Part II Standing Rigging!
Comments are welcome!
Well that completes Part I Of Rory's Guide. Stay tuned for Part II Standing Rigging!
Comments are welcome!

